I got a new Bible on my birthday a couple of years ago and I knew that I wanted to have a good Bible marking system to go along with it. So, I searched the net and gleaned great ideas from tons of other Bible markers out there and came up with what I thought was the perfect system. Problem was, it was tooooo complicated. I had a subtle shade of color for each of a jillion different categories and after a few verses, it took so long to mark, I stopped.
Fast forward to now (or not so long ago) when I listened to a talk on Meaningful Morning Time (the part about Bible marking starts roughly at 01:05:20) and I learned a super simple marking system that so far is working!
Now, I have yet to do any marking in my birthday Bible, I’m still trying to work out the bugs, but I still thought I’d share what I had so far and I can share any changes I come up with later.
I have taken to reading the Bible on my iPad because it’s easier to navigate, and if I make changes in my system down the road, I’m not locked into one particular highlighting code.
I use the Logos free app for my Bible marking because of the terrific number of highlighting tools it contains, and because of its ease of use. I also love the natural look of the highlighting, as if I was highlighting with real pen on real paper.
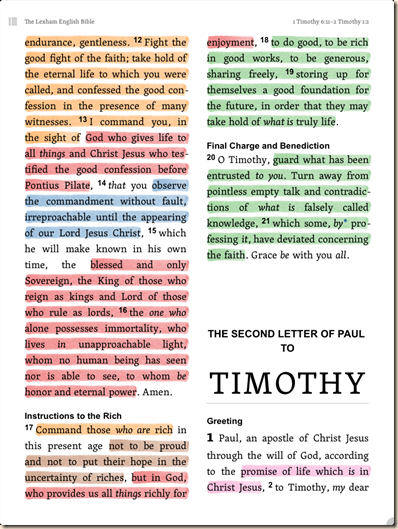
Here is a screenshot of a page from I Timothy:
It’s so easy and so much fun, I can’t wait to read my Bible now because it’s like finding buried treasure and I love the colorful look when I’m finished.
I’ve gotten my 10 y.o. and my 7 y.o. into it big time and they both caught on to it super quickly so it’s not hard to learn. I’ve designated separate versions to each of us so we can do our own marking without messing each other up in the same version. The only thing better would to get each of them their own tablet ($$$) so they can leave mine alone, lol
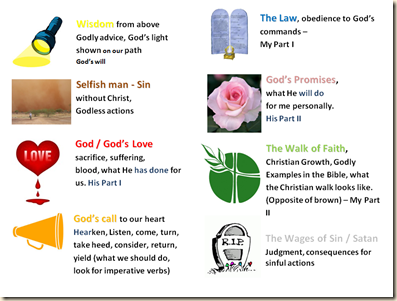
I made a little cheatsheet using clipart (I adjusted Alane’s version since I’m a visual person) to help me remember the colors at first.
If you have a favorite marking system, I’d love to hear about it!
